Recently I was working on a proof-of-concept web application that I wanted to deploy to a public cloud for a quick demo.
I decided to use Amazon as I already had experience with it. Amazon offers several different ways to deploy a Java web application.
EC2 gives us the flexibility to install and configure whatever we want to on the box. This is a very flexible solution for someone who wants to take controll over how their application is deployed and running, but it’s drawback is that we have to do most of the server installation & configuration and the application deploy tasks by ourselves.
The Elastic Beanstalk is an easy-to-use service that automatically handles deployment, auto-scaling, load-balancing and health monitoring. Using Elastic Beanstalk anyone can deploy a web application to the Amazon cloud with just a few clicks.
I decided to go with the quick and easy Elastic Beanstalk option…
Elastic Beanstalk has various ways to deploy Java applications:
- Using Docker
- Deploying a war file to a Tomcat server
- Deploying fatjar executed from the command line
In this post I’m going to cover the option using a fatjar, which is basically a single jar file that has all classes and jar dependencies bundled in it.
To make this working in Amazon, the jar file has to be placed inside a zip file.
Create JAR and ZIP files
In this post I’m using Maven to create both the jar and the zip files discussed above. Let’s walk through a sample pom.xml file to see how it’s done:
<?xml version="1.0" encoding="UTF-8"?>
<project xmlns="http://maven.apache.org/POM/4.0.0" xmlns:xsi="http://www.w3.org/2001/XMLSchema-instance" xsi:schemaLocation="http://maven.apache.org/POM/4.0.0 http://maven.apache.org/xsd/maven-4.0.0.xsd">
  <modelVersion>4.0.0</modelVersion>
  ...
  <groupId>com.kaviddiss</groupId>
  <artifactId>spring-boot-aws-beanstalk</artifactId>
  <version>0.0.1-SNAPSHOT</version>
  <packaging>jar</packaging>
  ...
  <parent>
    <groupId>org.springframework.boot</groupId>
    <artifactId>spring-boot-starter-parent</artifactId>
    <version>1.3.2.RELEASE</version>
    <relativePath />
    <!-- lookup parent from repository -->
    </parent>
  <dependencies>
    <dependency>
      <groupId>org.springframework.boot</groupId>
      <artifactId>spring-boot-starter-web</artifactId>
    </dependency>
    ...
  </dependencies>

  <build>
    <finalName>${project.artifactId}</finalName>
    <plugins>
      ...
      <plugin>
        <groupId>org.springframework.boot</groupId>
        <artifactId>spring-boot-maven-plugin</artifactId>
      </plugin
       <plugin>
      <!-- NOTE: We don't need a groupId specification because the group is org.apache.maven.plugins ...which is assumed by default. -->
        <artifactId>maven-assembly-plugin</artifactId>
        <version>2.6</version>
        <executions>
          <execution>
            <id>make-zip</id>
            <!-- this is used for inheritance merges -->
            <phase>package</phase>
            <!-- bind to the packaging phase -->
            <goals>
              <goal>
                single
              </goal>
            </goals>
          </execution>
        </executions>
        <configuration>
          <appendAssemblyId>false</appendAssemblyId>
          <descriptors>
            <descriptor>src/assembly/zip.xml</descriptor>
          </descriptors>
        </configuration>
      </plugin>
    </plugins>
  </build>
</project>
This file is based on a pom.xml file generated for Spring Boot web applications at http://start.spring.io/, and it includes a few additional changes:
- Make sure the packaging tag is set to jar
- The spring-boot-maven-plugin will take care of creating the jar file including all jar dependency inside the file itself
- Configure the maven-assembly-plugin to generate a zip file from the jar file using the src/assembly/zip.xml descriptor file
After configuring the maven-assembly-plugin in the pom.xml file, we’ll also need to configure the zip.xml descriptor that tells the assembly plugin how to construct the zip file itself.
<assembly xmlns="http://maven.apache.org/plugins/maven-assembly-plugin/assembly/1.1.3"
 xmlns:xsi="http://www.w3.org/2001/XMLSchema-instance"
 xsi:schemaLocation="http://maven.apache.org/plugins/maven-assembly-plugin/assembly/1.1.3 http://maven.apache.org/xsd/assembly-1.1.3.xsd">
   <id>zip</id>
   <formats>
     <format>zip</format>
   </formats>
   <includeBaseDirectory>false</includeBaseDirectory>
   <fileSets>
     <fileSet>
       <directory>${project.build.directory}</directory>
       <includes>
         <include>${project.artifactId}.jar</include>
       </includes>
       <outputDirectory>.</outputDirectory>
    </fileSet>
   </fileSets>
</assembly>
As you can see above, we configured the output to be zip, which is one of the many supported formats.
We also configured to include the jar file in the top level directory of the zip file. And that’s all needed by Amazon to run the application from the command line,
Sample microservice using Spring Boot
To be able to test the maven configuration, I created a simple Spring Boot web application (see below).
Application.java
import org.springframework.boot.SpringApplication;
import org.springframework.boot.autoconfigure.SpringBootApplication;
import org.springframework.stereotype.Controller;
import org.springframework.web.bind.annotation.RequestMapping;
import org.springframework.web.bind.annotation.ResponseBody;

@SpringBootApplication
@Controller
public class Application {
  @RequestMapping(value = "/hello")
  public @ResponseBody String helloWorld() {
    return "Hello, World!";
  }

  public static void main(String[] args) {
    SpringApplication.run(Application.class, args);
  }
}
This Application class serves the main class of the web application and will be the entry point when running the fatjar from the command line
Deploy to Elastic Beanstalk
If you haven’t signed up for AWS Elastic Beanstalk yet, you can follow this link: https://console.aws.amazon.com/elasticbeanstalk.
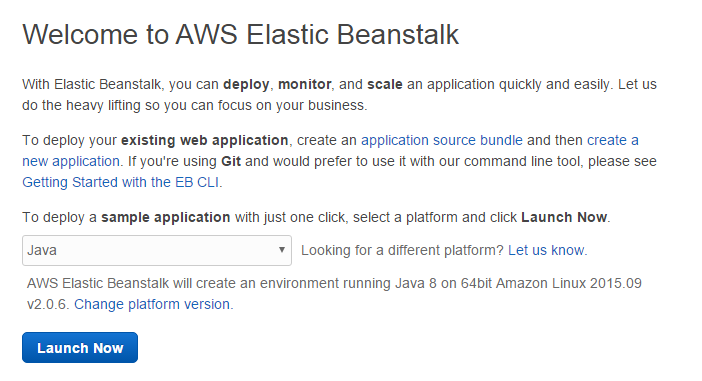
Select Amazon Elastic Beanstalk Platform
Once inside the console, click on create new environment for application. Then click on Create web server select Java in the platform dropdown and click Launch Now.
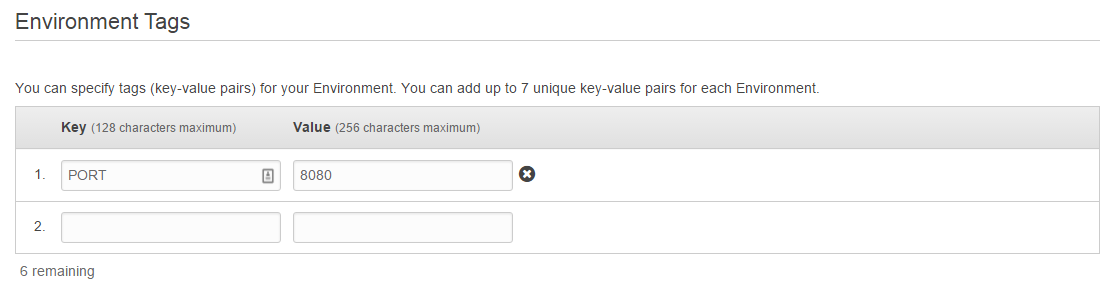
Set Environment Variable